
just wondering would these be all right to use for foot-well lighting
http://www.ebay.co.uk/itm/2pcs-30cm-...item337f514942
thanks

Results 1 to 10 of 11
Thread: are these suitable
-
23rd January 2013, 07:11 PM #1Member


- Join Date
- Mar 2011
- Posts
- 0
are these suitable
-
Advertising

- Diagnostics.org.uk
- has no influence
- on advertisments
- that are displayed by
- Google Adsense
23rd January 2013, 07:29 PM #2Member
- Join Date
- May 2012
- Location
- west bromwich
- Posts
- 2
- Vehicle
- astra mk5 1.7 cdti
I prefer them much better than other as they stick , get them mate and all they need is connected to your door switches
23rd January 2013, 07:37 PM #3Member
- Join Date
- Mar 2011
- Posts
- 0
thanks lads
i was going to follow a guide a found online
How to fit foot well SMD’s so they work the same as the interior light.
This is basically a run through of how I did it; there are many ways of adapting it, please feel free.
I purchased my kit from w4ssy and most of what was needed came in the kit, but you will need to add one or two more cheep items.
Parts/tools list:
SMD kit from w4ssy
Approx 4m of bell wire (or 8m of 5amp single core)
Two bits of connector block (http://cgi.ebay.co.uk/4PC-TERMINAL-ELECTRICAL-CONNECTOR-BLOCK-5A-10A-3752_W0QQitemZ330383901088QQcmdZViewItemQQptZUK_BO I_Electrical_Components_Supplies_ET?hash=item4cec6 a41a0 )
Electrical tape
T20 Torx screwdriver
Wire strippers or equivalent
Flat blade screwdriver.
Either disconnect the battery before commencing work or remove fuse number 13 (Courtesy light 5 amp) from the front fuse box under the bonnet.
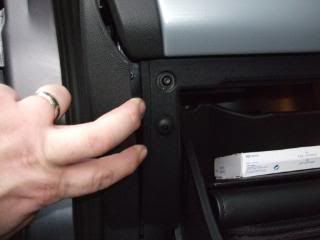
First take of the passenger and drivers side trims that cover the foot well air vents, do this by twisting the two black retaining clips anti-clockwise.

Then remove the glove box (plenty of tips how to do this on the forum)
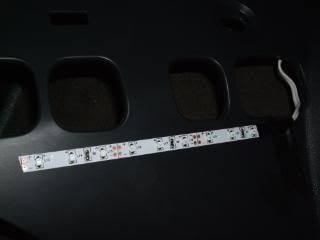
Feed one of the SMD strips from the passenger’s side to the driver’s side behind the centre console. White wire in the picture.
Then secure the strip onto the air-vent cover you just removed via the double sided tape on the back of the SMD. Use a strip of electrical tape to secure the wire to the vent cover. Do the same to the vent on the passenger side.
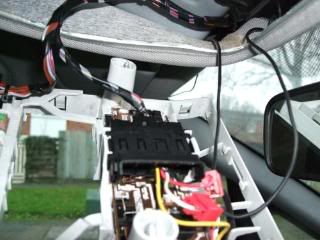
Now time to remove the covers from the roof light (this may differ if you have an alarm etc fitted into the roof console)
Carefully using a flat head screwdriver or tool of choice remove the trim panel closed to you by easing it out from the side.
Second panel can be teased out by releasing the two clips at the front.
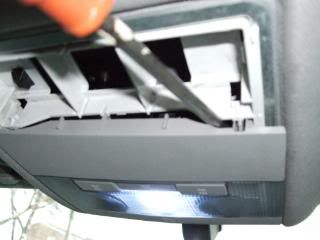
Remove the rear trim by easing from the side.
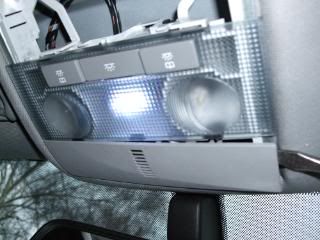
The light cover itself is best teased off from the back by sliding the screwdriver into the clips and prising out.
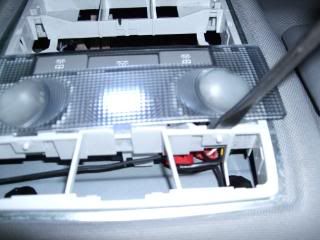
The main light body is held in place by two T20 Torx screws and two clips on either side.
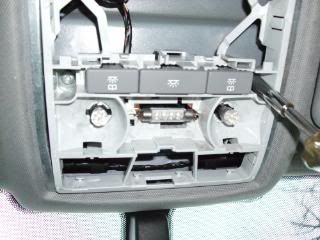
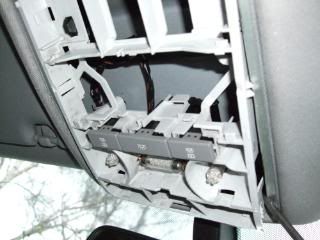
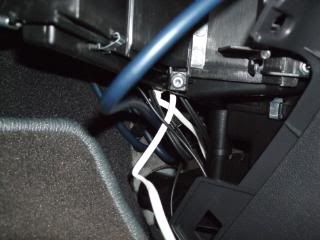
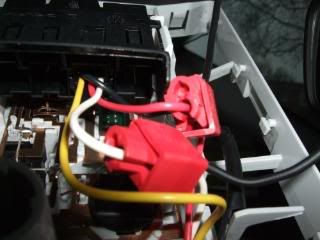
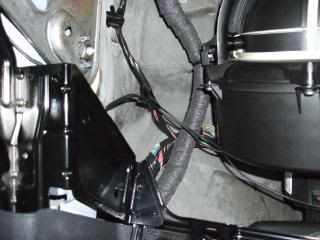
Now for the connecting of the feeds back down to the SMD’s. On the back of the light housing you will find four coloured wires (yellow, black, red and white) the two we need are; RED (constant positive) and WHITE (switched negative) You could if you wish match these to the smaller wires coming out the back of the connector and tap into the behind the glove box; I did think of this so as to save chasing wires up to the light, but gave up looking for them.
Using either a Scotch lock or method of your choice, connect the – negative feed to the WHITE wire; then the + positive feed to the RED wire.
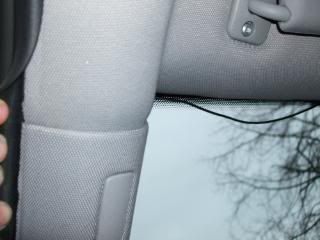
Feed the cable through the hole in the roof lining, tucking it into the front of the roof lining back towards the “A” pillar.
Feed it into the top of the plastic cover on the “A” pillar then tuck it behind the rubber door seal.
Feed it behind the plastic trim that holds the side of the glove box
Then behind the metal bracket behind the glove box
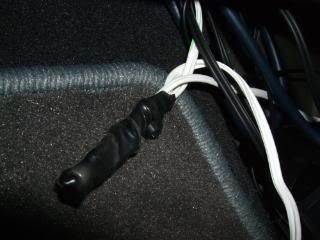
Using the Choky block (electrical connecting block) or similar, connect the – negative to the negative wire of the SMD kit; + portative to the positive wire on the SMD kit. Rap up in electrical tape to make secure and safe.
Re-connect battery or put fuse 13 back in and test SMD’s.
If all is well refit roof light, glove box and air-vent covers, reversing the removal procedure.
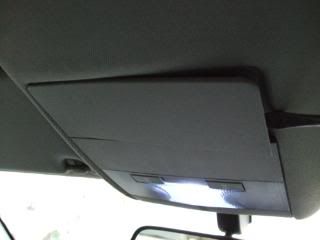
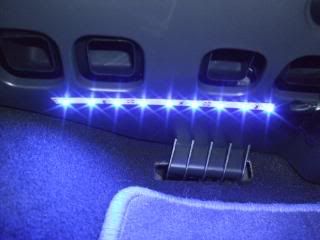
They should light up the same as the roof courtesy light (not via the button) i.e., when the car is unlocked, doors opened, ignition turned off. They should fade down when the ignition is turned on, doors locked or after the canbus turns off the power after a short time.

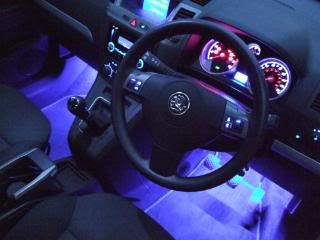
If you wish to fit rear SMDs’? These simply attach under the seat base via double sided tape then feed the wires from them to the passenger’s side of the centre console, tucking them under the bottom of the centre console till you get behind the glove bow. Connect the – and + to there corresponding partners you connected with the choky block in stage one(electrical connecting block).
This is only a guide, adapt as you feel fit.
I do not take any responsibility for you undertaking this task via the guide.
Many thanks Shawn.
does that guide look right lads?
24th January 2013, 11:12 AM #4Member
- Join Date
- Mar 2011
- Posts
- 0
ahhh might have to look into that as this seems abit long
and really aint confident chopping into wiring :O
24th January 2013, 11:18 AM #5VIP

- Join Date
- Aug 2010
- Location
- Wombourne, South Staffs
- Posts
- 3,060
- Vehicle
- Astra 1.9 16v CDTi SRi XP+ Power Red Estate
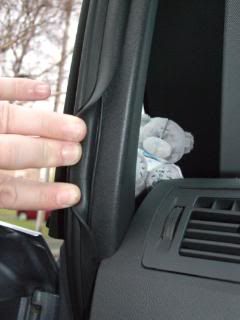
You really shouldn't use the scotch locks for tapping into wiring as they're **** to be honest and only for use as a last resort, you're better off splicing and taping or soldering if you can, the door wiring is a bugger to get to, you're still better off running the cables to the courtesy light, the pillars just unclip but the clip marked 'airbag' usually breaks when you remove them, if they do, just glue them or velcro them back on, there is no airbag in the pillar to worry about, its just the rip cord for the one in the roof lining above the door so try not to mess with it if you can help it


24th January 2013, 11:56 AM #6Member
- Join Date
- Mar 2011
- Posts
- 0
oh god G now am thinking i might set the airbag off

how much would you charge to put these in
26th January 2013, 08:05 PM #7Member
- Join Date
- Mar 2011
- Posts
- 0
will this wire be suitable?
http://www.ebay.co.uk/itm/1-0-6mm-Si...item23221ad5e9
26th January 2013, 08:44 PM #8VIP
- Join Date
- Aug 2010
- Location
- Wombourne, South Staffs
- Posts
- 3,060
- Vehicle
- Astra 1.9 16v CDTi SRi XP+ Power Red Estate
Yeah that'll do it
27th January 2013, 06:06 PM #9Member
- Join Date
- Mar 2011
- Posts
- 0
thanks mate
i'll get some ordered
27th January 2013, 07:03 PM #10Member

- Join Date
- Apr 2012
- Location
- West Bromwich
- Posts
- 595
- Vehicle
- Various
I think this may be my next mod
Visitors found this page by searching for:
Nobody landed on this page from a search engine, yet!Tags for this Thread
 Posting Permissions

 Reply With Quote
About us
This site was created by Pecky to act as a knowledge base of useful information regarding Vauxhall cars.Whilst I can help out with works, this isn't my full time job, so occasionally there may be a delay in replying.
Other forums
AON, VXR-Online, Insignia-drivers.uk
Diagnostics.org.uk is a trading name of RJP Projects Ltd which is a company registered in England and Wales with company number 7453778
Bookmarks